Wednesday, 27 February 2019

How to Extract Purchased Ringtones from iPhone


How to Extract Purchased Ringtones from iPhone

Naturally, your first plan of action would be to investigate whether or not iTunes can properly handle this. The short answer is “yes”, but not without its complications and limitations.
Sponsor ads:Change Message/iMessage Background on iPhone with/without Jailbreak
Step 1: Make sure the computer that you’re using has been properly authorized to play your iTunes Store purchases. You can grant authorization to your computer by going to “Account > Authorizations > Authorize This Computer” on your iTunes and click “Authorize”.


Step 2: Using your iPhone USB charging adapter, connect your device to your computer through a free USB port.

Step 3: Once your device has been recognized by iTunes, go to “File > Devices > Transfer Purchases from [your device]”.


This will help you to extract all the purchased files from iPhone to your iTunes library, including music, movies, audiobooks, TV shows, ringtones and more.Sponsor ads:iPhone/iPad Keeps Restarting? Here’s the Fix!

Disadvantages of Using iTunes:


iTunes will only support tones that were purchased through the official iTunes Store. This severely limits your freedom when it comes to tones that you created yourself or customized from a purchased source.


Furthermore, there has been various reports of bugs and critical errors within iTunes that has resulted in major data loss and unwanted erasures.


You can’t selectively extract only the specific ringtones from iPhone.


Transferring all the purchased files from iPhone may cause lots of duplicate files on your iTunes library.

While iTunes limitations are continually growing more apparent and restrictive, countless third-party developers are adapting and designing intuitive alternatives that get the job done more efficiently. In my experience iMyFone TunesMate iPhone Transfer not only does a better job completing this task, but this application grants far more freedom to the user and offers a much simpler layout.

Tuesday, 26 February 2019

iTunes Could Not Restore the iPhone X/8 Because An Error Occurred 2019

iTunes Could Not Restore the iPhone X/8 Because An Error Occurred 2019
1. Fix iTunes could not Restore the iPhone because an Error Occurred
1. Not Enough Space on iPhone:

The reason for the occurrence of the message is because of the absence of the needed space on the device. Go to Settings > General > Usage to check how much usage is available. ?If there is not enough space, free some of the content before creating a backup.


2. Backup is Corrupt or Incompatible

You will see this message of “iTunes could not restore the iPhone because the backup was corrupt or not compatible the iPhone that is being restored” when the backup available on the Mac or PC is corrupt or incompatible with the device that you are trying to restore. There might be something wrong when you make a backup with iTunes. You’d better delete the backup and try again.


3. Networking Problem

When there is an issue with the networking problem, then you will fail to reset the device. You can resolve the same by:


Check the internet connection, as the restoration is a lengthy process and ensure that all the cables are intact.


Apple’s servers go down from time to time. Ensure that you are not restoring the device during such period.


If the firmware is different, iTunes fails to detect the same and complete the restoration process. Let iTunes download it automatically.


Apple is preventing from signing a few firmware to stop jailbreaking and close security loop holes. If you are using such a firmware, then iTunes will pop-up with the message that there is an error.


4. Issue with USB Ports

In a few situations, the mistake that you see could be due to improper functioning of the USB port. Although iTunes may begin working at the start, it will soon throw a message when restoration starts. You can check if the issues have relation to USB ports by:


Replacing the existing USB cable with Apple certified USB cable will let you know about the problem. Keep away from cheap cables.


You can check the process by inputting the cable into a different USB port. A few ports of the system contain lower power and speeds. Try changing to others and check whether iTunes is allowing the completion of the process.


Use a different Mac or PC to check for the errors.


You can also check for any breakages of the cable. If there are any, you can replace them and perform the task.


Avoid keyboard and USB hubs, and make a direct contact between the device the Mac or PC.


2. Restore iTunes Backup Fully & Partially with 3rd-Party Tool

Rather than restoring everything from an iTunes backup, you can carry out selective restoration with the help of iMyFone iTransor. The software also provides full restore feature too! It is a perfect alternative to iTunes, as it does not impose any restrictions on restoring data. Essential functions include:
Sponsor ads:Speed up USB 3.0/2.0 Transfer in Windows 10
Sponsor ads:Perfect Samsung Smart Switch Alternatives for Data Transfer

Sponsor ads:Budget and Expense Tracking Apps for iPhone/iPad in 2019 Sponsor ads:

Gihosoft Free iPhone Data Recovery:https://www.gihosoft.com/iphone-data-recovery-free.html

Gihosoft iPhone Data Recovery Free

Free iPhone Data Recovery Software for Windows/Mac

Recover up to 12+ types of files, including contacts, SMS, photos, WhatsApp, Viber, notes, etc.

Restore lost data from iOS devices directly or from iTunes and iCloud backup

Recover iPhone data lost due to iOS upgrade/jailbreak, accidental deletion, device lost or broken

Support all the latest iPhone, iPad and iPod Touch

Both Free and Pro version.

If you lost data after you updated to a new iPhone, you can always use Gihosoft iPhone Data Recovery to get the data back from the old iPhone or backup.You may also like: iphonerecovery.com

If you use android phones, please choose Gihosoft Android Data Recovery.

With Gihosoft Android Data Recovery, no longer afraid of data loss!

Must read:Youtube video downloader for pc

Gihosoft RePicvid Free Photo Recovery Software provides a free photo recovery software for windows to help users recover the deleted or lost photo for free.

Jihosoft Android Data Recovery: the best Android Data Recovery software for Windows and Mac to recover deleted contacts, messages, photos, videos, WhatsApp and etc from Android devices.Tips:How to transfer messages from iPhone to iPhone


jihosoft Free iPhone Data Recovery

How to Add Ringtones to iPhone XR/XS/X/8 via in Old iTunes 2019


How to Add Ringtones to iPhone XR/XS/X/8 via in Old iTunes

The process of adding ringtones to iPhone X/8 via iTunes is pretty straightforward because ringtones can be synced via iTunes just like all other media.

Follow these steps to add ringtones to iPhone via iTunes which is ealier than version 12.7:


Step 1: Connect your iPhone XR/XS/X/8 to your computer, it will be automatically detected by iTunes.

Step 2: Now navigate to Tones section of iTunes. It is one of the tabs available at the top of software’s interface.

Step 3: Now drag and drop ringtones from your computer’s hard disk to your iTunes library.

Step 4: Click on the device tab at the upper left corner and select "Tones" from the left.

Step 5: Check Sync Tones and select the tones. Click Apple to let it sync.

Now you can disconnect your iPhone from your computer and enable the ringtones you have just synced. Your synced ringtones will be available in the ringtones section in the Settings App. Choose the ringtone you would like to use and you are done!

Tones tab disappears on iTunes 12.7? How to Transfer Ringtones Using iTunes >>

Cons


There is one major risk of using this method; iTunes might erase your custom ringtones on iPhone that you have already added while syncing.


iTunes can't extract ringtones from iPhone to your computer and share with your friends.
How to Add Purchased Ringtones to iPhone XR/XS/X/8 via Settings

If you want to add your already purchased ringtones on your iPhone XR/XS/X/8, then you are in luck because iOS 11 has a new feature that allows you to do it very conveniently.

Follow these steps to re-download purchased ringtones on iPhone XR/XS/X/8:Sponsor ads:Avoid Toll Roads in Apple Maps and Google Maps
Sponsor ads:Best Barcode and QR-Code Scanner Apps for iPhone in 2019


Step 1: Launch the Settings app on your iPhone.

Step 2: Navigate to Sounds section in the settings and then tap on any available sound in the provided list.

Step 3: Now select Download All Purchased Tones option available at the top of the page. Doing this will start re-downloading your purchased ringtones and then make them available once the process is completed.

Note

Keep in mind that iOS will only download those ringtones that are available on iTunes Store. And if the owner has erased a ringtone from the Store, then you won’t be able to re-download it.Sponsor ads:

Gihosoft Free iPhone Data Recovery:https://www.gihosoft.com/iphone-data-recovery-free.html

Gihosoft iPhone Data Recovery Free

Free iPhone Data Recovery Software for Windows/Mac

Recover up to 12+ types of files, including contacts, SMS, photos, WhatsApp, Viber, notes, etc.

Restore lost data from iOS devices directly or from iTunes and iCloud backup

Recover iPhone data lost due to iOS upgrade/jailbreak, accidental deletion, device lost or broken

Support all the latest iPhone, iPad and iPod Touch

Both Free and Pro version.

If you lost data after you updated to a new iPhone, you can always use Gihosoft iPhone Data Recovery to get the data back from the old iPhone or backup.You may also like: iphonerecovery.com

If you use android phones, please choose Gihosoft Android Data Recovery.

With Gihosoft Android Data Recovery, no longer afraid of data loss!

Must read:Youtube video downloader for pc

Gihosoft RePicvid Free Photo Recovery Software provides a free photo recovery software for windows to help users recover the deleted or lost photo for free.

Jihosoft Android Data Recovery: the best Android Data Recovery software for Windows and Mac to recover deleted contacts, messages, photos, videos, WhatsApp and etc from Android devices.Tips:How to transfer messages from iPhone to iPhone

jihosoft Free iPhone Data Recovery

Convert iPhone Photo to JPG Online 2019


Convert iPhone Photo to JPG Online

There is another way to convert your iPhone photos to JPG. However, you will need go online for that. There are plenty of online conversion sites you can use for this purpose. heictojpg.com is one such site that offers HEIC to JPG conversion.


Follow these steps to convert your iPhone photo to JPG via heictojpg.com:

Step 1: Visit heictojpg.com in your web browser.

Step 2: Once the site is opened, you will see a box asking you to upload your HEIC photos for conversion.

Step 3: You can either click the box to upload your photos or alternatively you can use drag and drop method to do this.

Step 4: Upload the photos you wish; you can upload up to 50 photos for conversion.

Step 5: Once the photos are uploaded, the conversion process will start and then you will be notified once the conversion is finished. You can then download them in your computer.

Note

While online conversions also get the job done and cover your HEIC to JPG conversion needs, there are some cons associated with this method as well.


Online websites will upload your photos to their server for conversion. This is not safe as it has a risk of privacy leak.


Online HEIC to JPG conversion are relatively slower as compared to offline conversions. Factor such as your internet speed also matter a lot in this as you will need to upload your photos and then download them after conversion. So the whole process will take a lot of your time.


Most online conversion sites impose limits, for example heictojpg.com allows you to convert up to 50 photos once a time.


No preview before conversion.


You won’t be able to adjust your desired photo quality of converted photos.
How to Set iPhone to Take JPEG Photos

You can also configure your iPhone settings to take JPEG photos with your camera. This feature is only available in devices with iOS 11(iPhone X, iPhone 8/8 Plus, iPhone 7/7 Plus, etc.).

Follow these steps to set iPhone to take JPEG photos:


Step 1: Select Camera menu from the Settings app on your iPhone.

Step 2: Now choose the Formats option and then select Most Compatible from the listed options.

Note

Configuring this will set your iPhone to capture images in JPEG format. However, keep in mind that your existing HEIC photos will stay in the same format and will need to be converted for compatibility.
Sponsor ads:Windows 10 Go Back to An Earlier Build Missing after 10 Days
Sponsor ads:Top 7 Websites to Stream Your Favorite Christmas Movies in 2018


Sponsor ads:Share YouTube Video at Specific Time from App and Browser

How to Download Videos from iPhone to Laptop 2019

How to Download Videos from iPhone to Laptop 2019
How to Download Videos from iPhone to Laptop - the Official Solutions
To Mac

You can make use of the Photos app to transfer videos from iPhone to your Mac computer follow the steps below:

Step 1: Ensure you download iTunes latest version on your Mac.

Step 2: Use a cable to connect your iOS device.

Step 3: A popup will appear asking you to Trust This Computer. Click to trust to continue.

Step 4: Photo app will automatically open on your Mac. Open if it doesn't.

Step 5: The Photo app will show all videos available on your device.

Step 6: Click on the videos you want and tap IMPORT SELECTED to transfer videos to your iDevice.


To Windows

You can use the Windows photo gallery to download videos from iPhone to your PC by connecting your iOS device to PC.

Step 1: Get the latest version of iTunes on your PC.

Step 2: Use a USB cable to connect your iOS device to Windows PC.

Step 3: Afterwards, click on trust or allow to enable your PC to connect to your device.

Step 4: Launch photos gallery and import videos from iPhone to PC.


The Easiest Ways to Download Videos from iPhone to Laptop (Both Mac and Windows)
Sponsor ads:7 Best Twitch Streaming Software (Free and Paid) for You 2019
Also Read:Fix iTunes Error 1671 When Updating iPhone/iPadSponsor ads:Apps To Brighten & Enhance Videos Taken on iPhone


Also Read:Fix and Repair Old Photos?

How to Delete Viber Group Chat from iPhone Manually 2019


1. How to Delete Viber Group Chat from iPhone Manually

Deleting viber group chats manually on iPhone is actually possible. Messages that appear on the main screen or other forms of messages can be easily deleted. Here is a step by step process of how to delete Viber group chat even though it can still be recovered with the aid of recovery tools thereby making it unsafe.
1.1 Delete Viber Group Chat without Leaving the Group

Step 1: Locate the Viber icon on your iPhone and launch it.

Step 2: Go into the group where you have some messages to delete.

Step 3: Find the messages that you wish to delete and hold it for a long time until you see Delete. Tap on it

Step 4: Then you need to choose either Delete for myself or Delete for everyone. Click Yes on the confirming window.


It is important to understand that "Delete for everyone" option applies to the message that you sent and not the message sent to you by others as these messages will still appear on other people's device.
1.2 Clear Viber Group Chat While Leaving the Group

Step 1: Launch the Viber app on iPhone.

Step 2: Go into the group that you want to delete and leave.

Step 3: Tap on the gear menu at the upper right corner and you will enter the group settings.

Step 4: Swipe the group name to the left and tap the red X button.

Step 5: Tap Leave and Delete from the confirmation window.
Also Read:Delete the Downloaded iOS Update on iPhone/iPad (iOS 12)

Sponsor ads:
Gihosoft iPhone Data Recovery Free
Free iPhone Data Recovery Software for Windows/Mac
Recover up to 12+ types of files, including contacts, SMS, photos, WhatsApp, Viber, notes, etc.
Restore lost data from iOS devices directly or from iTunes and iCloud backup
Recover iPhone data lost due to iOS upgrade/jailbreak, accidental deletion, device lost or broken
Support all the latest iPhone, iPad and iPod Touch
Both Free and Pro version.
If you lost data after you updated to a new iPhone, you can always use Gihosoft iPhone Data Recovery to get the data back from the old iPhone or backup.You may also like: iphonerecovery.com
If you use android phones, please choose Gihosoft Android Data Recovery.
With Gihosoft Android Data Recovery, no longer afraid of data loss!
Gihosoft RePicvid Free Photo Recovery Software provides a free photo recovery software for windows to help users recover the deleted or lost photo for free.
Jihosoft Android Data Recovery: the best Android Data Recovery software for Windows and Mac to recover deleted contacts, messages, photos, videos, WhatsApp and etc from Android devices.Tips:How to transfer messages from iPhone to iPhone

Sponsor ads:Fix Audio Issues on Windows 10 with 5 Methods that Work in 2019

How to Fix iPhone Screen Not Rotate Issue 2019


How to Fix iPhone Screen Not Rotate Issue 2019
“After downloading ios 12 to my iPhone X, the screen remains locked in portrait orientation with many apps. I researched support postings and the only suggestion was to turn the iPhone off and back on. This did not resolve the problem. I can’t get the screen to rotate to landscape on apps that previously supported landscape such as my amazon.com page. FIX IT, please!”

To guarantee that your iPhone screen orientation after upgrading to iOS 12/11.3/11.2/11.1/ 11 is functioning appropriately, you can hold the device in either direction - vertical and horizontal - and check for the change in the positioning.

There are a few applications as well as contents that only function on a single screen orientation. For instance, few applications operate just in portrait mode while a few are capable of working in both portrait and landscape mode. However, if the home screen, apps, and other contents are not functioning even after rotating the device, then it is a different story.
Part 1. Common Reasons of iPhone Screen Not Rotate

The reasons behind the non-functionality of the portrait and landscape mode on your iPhone could be several. The following could be the possible triggering factors:


App malfunctioning


Incorrect display settings


Defective accelerometer or gyroscope


Bad updates


Hardware damage
Part 2. How to Fix iPhone Screen Not Rotate Issue

The following factors will be helpful in fixing the iPhone screen rotation problem:


Tip 1. Verifying the display zoom factor


Tip 2. Calibrate the gyroscope


Tip 3. Rebooting iPhone


Tip 4. Fix iPhone system with iOS system recovery
Tip 1. Verifying the display zoom factor

You can check for the Display Zoom feature on the device. If it is on, then it will interfere with the rotation of the screen. When iPhone fails to display even after turning it sideways, users can follow the steps below to fix the rotation problem:

Step 1. Visit the Settings application and choose “Display and Brightness” feature.

Step 2. Under the “Display and Brightness” option, click “Display Zoom” feature. Tap on the view option to check whether the Display Zoom is on or off.

Step 3. If the option is in the status of Zoom condition, then opt for the standard option to turn off the feature. Click on the Set button to save the changes.

Step 4. In the next screen click “Use Standard” to continue with the standard mode.

Step 5. After completion, the phone will restart in the standard mode.


Tip 2. Calibrate the gyroscope

Calibrating gyroscope will also be helpful in fixing the orientation problem. You can follow the steps below to perform the action.

Step 1. Restart the iPhone, and hold the home button to launch the home screen.

Step 2. Open the compass application and you will see a pop-up message that asks for calibrating the gyroscope. If you do not see the option, double tap on the home screen, and open the compass application again.

Step 3. Use the red ball to roll it around the circle on the calibration screen. Continue it until the calibration is complete. Upon completion, the compass application launches, which tells you that the process is successful.


Tip 3. Rebooting iPhone (Work for iOS 12, Also)
Rebooting iPhone X

Immediately push and release the volume up button at first, and the volume down button secondly. Hold the side button until the device turns off.


Rebooting iPhone 8/7

Hold the on/off button and press the volume down key until the screen turns off. Hold the switches until the instrument turns back on.Also Read:Create Boomerang from Existing Videos on Android/iPhone 2019
Also Read:Rotate Video on Facebook 2019


Tip 4. Fix iPhone System with iOS System Recovery

Use iMyFone iOS System Recovery to solve several issues faced by the device and get it back to its standard functionality. Outstanding features include data recovery, WhatsApp recovery, system recovery, and fixing iOS problems.

Sponsor ads:

Gihosoft Free iPhone Data Recovery:https://www.gihosoft.com/iphone-data-recovery-free.html

Gihosoft iPhone Data Recovery Free

Free iPhone Data Recovery Software for Windows/Mac

Recover up to 12+ types of files, including contacts, SMS, photos, WhatsApp, Viber, notes, etc.

Restore lost data from iOS devices directly or from iTunes and iCloud backup

Recover iPhone data lost due to iOS upgrade/jailbreak, accidental deletion, device lost or broken

Support all the latest iPhone, iPad and iPod Touch

Both Free and Pro version.

If you lost data after you updated to a new iPhone, you can always use Gihosoft iPhone Data Recovery to get the data back from the old iPhone or backup.You may also like: iphonerecovery.com

If you use android phones, please choose Gihosoft Android Data Recovery.

With Gihosoft Android Data Recovery, no longer afraid of data loss!

Must read:Youtube video downloader for pc

Gihosoft RePicvid Free Photo Recovery Software provides a free photo recovery software for windows to help users recover the deleted or lost photo for free.

Jihosoft Android Data Recovery: the best Android Data Recovery software for Windows and Mac to recover deleted contacts, messages, photos, videos, WhatsApp and etc from Android devices.Tips:How to transfer messages from iPhone to iPhone

jihosoft Free iPhone Data Recovery

Download Photo Albums from iPhone to Flash Drive 2019


1.2 Steps to Download Photo Albums from iPhone to Flash Drive

Step 1: Open iMyFone TunesMate and of course connect your iPhone and flash drive.

Step 2: Go to Photos tab at the top and all your albums will be listed at the left sidebar.

Step 3: Right click on the album that you want to transfer and click on Export to PC/Mac. Choose your flash drive and hit Select Folder to begin.


iMyFone TunesMate iPhone Transfer Software Review >>
2. Download and Move Photos from iPhone to Flash Drive via iCloud

Apart from the method mentioned above, you can download iPhone photos and then export them to your flash drive on your PC or Mac with iCloud. Use the following steps.

Step 1: Activate the iCloud sync feature for photos on your iPhone/iPad by going to “Settings > [your name] > iCloud > Photos” and turning on “iCloud Photo Library”.

Step 2: On your PC/Mac, log in on iCloud.com or iCloud program using your iCloud account.

Step 3: Click on Photos and wait a while till all images are loaded.


Step 4: Choose the photos you want to export and tap Download selected item button. This may take some time if the pictures are many.

Step 5: Connect your flash drive to your Windows PC/Mac and copy all images to your drive. You can delete the pictures from your PC if you don’t need them.
3. Save Photos from iPhone to Flash Drive (Only for Camera Roll Photos)

You can transfer iPhone photos to flash drive using the default program on Mac or Windows PC. However, this method only works on Photos in Camera Roll. The two methods above can be used for downloaded photos and app photos.
3.1 For PC: Photos Gallery

Step 1: Connect your iPhone/iPad to PC.

Step 2:


For Windows 7, AutoPlay window will pop up. Choose “Import pictures and videos using Windows”, then tap Import to transfer the Camera Roll photos to your PC.


For Windows 10, launch Photos app and press the Import button.

Step 3: Plug your flash drive to and transfer iPhone photos from PC to the flash drive.


3.2 For Mac: Image Capture

Step 1: Connect your flash drive and iPhone to your Mac.

Step 2: Search for Image Capture to start the program.

Step 3: Tap the name of your iPhone and the entire picture on your device will be delayed.

Step 4: Select your flash drive on the Import To bar as the output destination.

Step 5: To transfer your desired pictures, check the photos and then click Import. If you want to import all the photos, tap Import All.


4. Which Method Should You Use to Transfer Photos
Also Read:Voice Changing Apps & Software for Skype


Sponsor ads:Fix SD Card Error on GoPro Hero

Wednesday, 20 February 2019

iPhone XS vs Galaxy S10: What’s the Difference 2019


Samsung is out with the Galaxy S10e, Galaxy S10, and Galaxy S10+ — its flagship phones for 2019. The Galaxy S10 will take on the iPhone XS and comes packed to the gills with the best technology that’s currently available.

Samsung has focused on improving the basics with the Galaxy S10 and done away with a lot of clutter. Does that make the Galaxy S10 a worthy competitor to the iPhone XS? Which is the better smartphone between the two? Find out in our comparison.
iPhone XS vs Galaxy S10 Comparison: How Are They Different?
Design
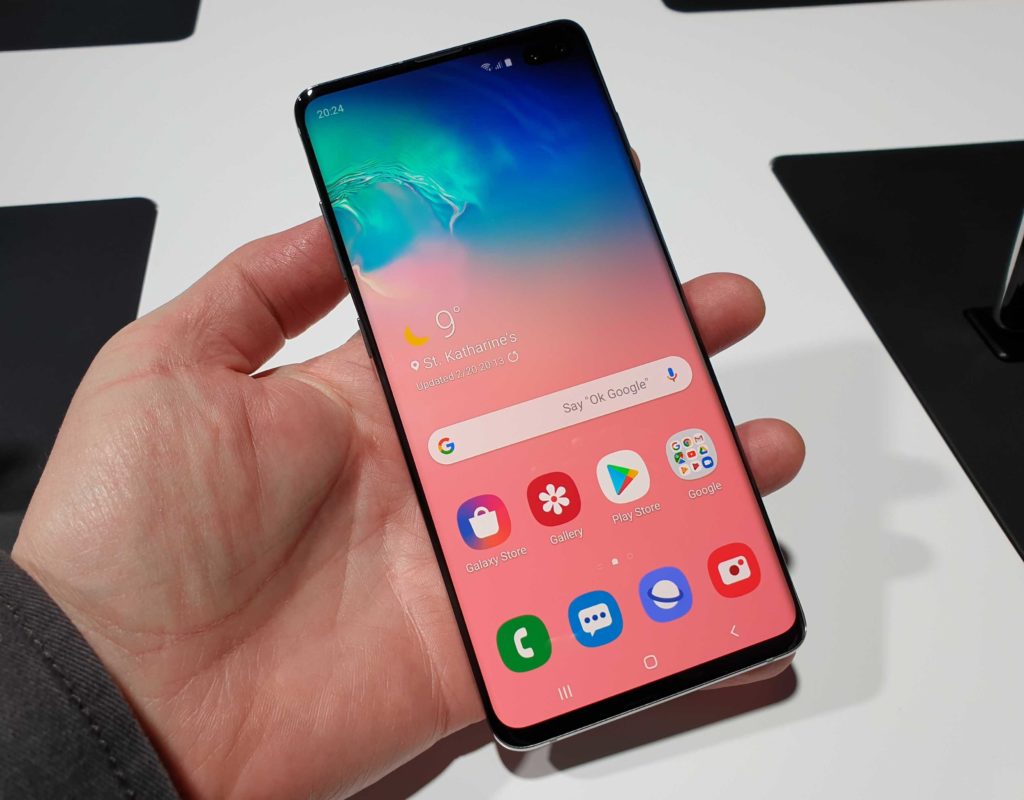


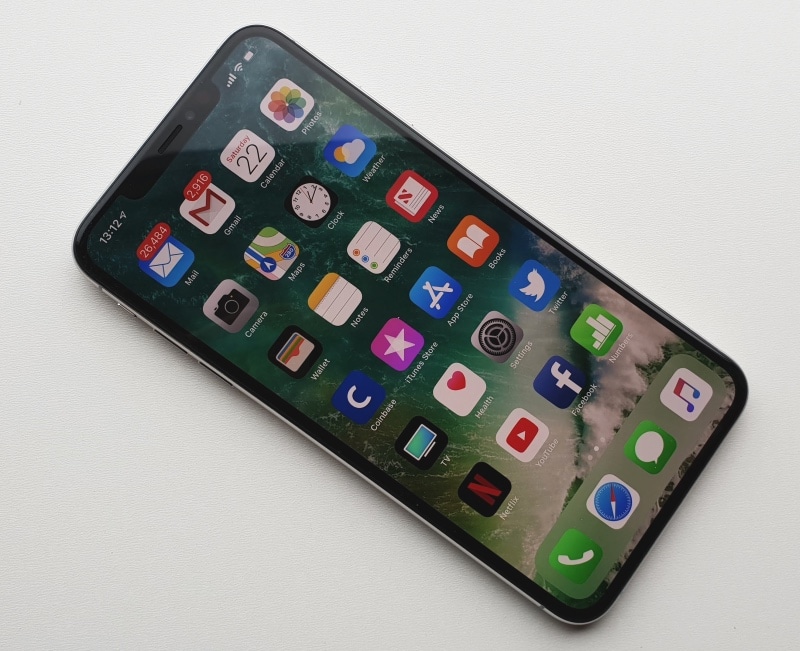
Both phones look drop-dead gorgeous and live up to their hefty price tags. The Galaxy S10 features a more modern look since it comes with a punch-hole display at the front. But then, unlike the iPhone XS, the Galaxy S10 still has a small bezel at the bottom.

The iPhone XS has a solid heft due to its stainless steel chassis. That chassis will also withstand dings and drops better than the aluminum chassis of the Galaxy S10. Both phones feature IP68 certification making them dust and water-resistant.
Display


iPhone XS – 5.8-inch True Tone OLED, 2688 x 1242 pixels (458ppi), 3D Touch, HDR10, Dolby Vision, 3D Touch


Galaxy S10 – 6.1-inch curved Infinity-O Dynamic AMOLED, 1440 x 3040 pixels (550ppi), HDR10, Dynamic AMOLED

The Galaxy S10 comes with a 6.1-inch QHD+ Infinity-O Dynamic AMOLED panel. That’s bigger than the 5.8-inch OLED panel the iPhone XS packs. Both displays are beautiful to look at and are the best smartphone displays in the market. However, the iPhone XS OLED panel features a notch at the top while the S10 has a unique punch-hole cutout for the front camera. It also has a notably higher resolution, though that’s something most people are unlikely to notice.

The S10’s panel is also curved on its left and right edges, while the iPhone XS has a flat OLED panel. The dynamic AMOLED panel on the Galaxy S10 is capable of reaching luminance levels as high as 1,200 nits which is notably higher than that of the iPhone XS.

Chipset


iPhone XS – 7nm A12 Bionic chipset


Galaxy S10 – 7nm Snapdragon 855 or 8nm Exynos 9820

The Galaxy S10 comes with a 7nm Snapdragon 855 chipset in the U.S. or an 8nm Exynos 9820 chipset in rest of the world. While the new Snapdragon 855 chip offers major performance improvement and is a massive step up in terms of efficiency as well, it is simply not as powerful as Apple’s A12 Bionic chip. That all boils down to Apple’s excellent chip designing team that has been setting the benchmark for quite a few years with their mobile chips.

The Snapdragon 855 does feature a more powerful Adreno 640 GPU but all that power is irrelevant because Android simply does not have the same high-quality games as iOS.
Camera


iPhone XS – Dual 12MP camera setup with f/1.8 and f/2.4 aperture, 1.4um pixel pitch, OIS for both sensors, Smart HDR, Focus Pixels, Portrait mode with advanced bokeh and Depth control


Galaxy S10 – Triple-camera setup, Primary 12MP camera with variable f/1.5 and f/2.4 aperture, 1.4um pitch pixel, OIS; Secondary 16MP f/2.2 ultra-wide angle shooter; Third 12MP f/2.4 telephoto sensor with OIS, 2x optical zoom, Auto HDR, Super Speed Dual Pixel, Live Focus with adjustable bokeh effect

The Galaxy S10 comes with a triple-camera setup at the rear while the iPhone XS features a dual-camera setup. Both phones feature a 12MP 1.4um primary shooter, though the one on the S10 features dual f/1.5 and f/2.4 aperture. The wider aperture on the S10 gives it an edge in low-light scenarios, though the differences all boil down to how both company process the photos.

The Galaxy S10 and iPhone XS also feature a secondary 12MP f/2.4 telephoto sensor with OIS for 2x optical zoom.

The third sensor on the Galaxy S10 is a 16MP f/2.2 aperture ultra-wide angle shooter similar to what we have seen on the Huawei Mate 20 Pro and some LG flagships. Apple is also expected to debut a similar camera setup on the 2019 iPhone XS Max successor later this year.

At the front, the Galaxy S10 features a 10MP f/1.9 aperture selfie shooter while the iPhone XS features a 7MP TrueDepth camera. The S10’s improved selfie sensor is able to take better photos, especially in low-light. And it is also the world’s first phone to capture 4K videos from the front camera.

Do note that not everyone will like the selfie processing on the Galaxy S10 as it tends to apply a gracious amount of sharpening and face smoothening effect despite the feature being completely toned down. The iPhone XS also applies a beauty filter but it is nowhere near as bad as what Samsung does.

Samsung is also debuting a new Super Steady stabilization for videos, though it remains to be seen how good the stabilization is compared to iPhones. The former can also record videos in HDR10, something which the iPhone XS lacks.


Storage


iPhone XS – 64GB, 256GB, 512GB


Galaxy S10 – 128GB, 512GB, microSD card slot

Another area where the Galaxy S10 is a clear winner. Even the base variant of the handset ships with 8GB RAM and 128GB storage. Plus, there’s a microSD card slot so that one can upgrade the storage on the cheap. In comparison, Apple still ships 64GB as the base storage across its entire iPhone lineup which is a shame in this day and age for a $999 smartphone.Also Read:Best 10 Movie4k Alternative Websites for Movie Streaming 2019

The iPhone XS also comes with 4GB RAM which is going to be enough for most users, though the S10 is a better multitasker because of the additional RAM it ships with.
Biometrics


iPhone XS – Face ID


Galaxy S10 – In-display fingerprint scanner, Face unlock

Apple is the only company that has completely done away with fingerprint sensors on its devices. The iPhone XS solely relies on Face ID and while it has become slightly faster in its second year, it is still nowhere near as good or as fast as second-generation Touch ID.

Samsung offers the best of both worlds on the Galaxy S10 by offering face unlock as well as an in-display fingerprint sensor.

Unlike Face ID, face unlock on the Galaxy S10 is notably faster, though it does so by compromising security. There is also an ultrasonic in-display fingerprint sensor. It is not as fast as the fingerprint sensor found on the Galaxy Note 9 or the OnePlus 6 but then, having a fingerprint sensor is better than not having one at all.
Connectivity


iPhone XS – Dual SIM/eSIM, Gigabit LTE, Wi-Fi ac with MIMO, Bluetooth 5.0, VoLTE, NFC with reader mode


Galaxy S10 – Dual SIM, Cat 20. LTE (2Gbps), Wi-Fi 6, Bluetooth 5.0, VoLTE, NFC, 3.5mm headphone jack

This is an area where the Galaxy S10 is a clear winner. The device comes with an LTE modem that’s capable of reaching download speeds of 2Gbps — that’s twice of what the iPhone XS is capable of. It also features other advanced connectivity features for improved network performance including Wi-Fi 6 — the first smartphone in the world to do so.

In comparison, the iPhone XS only comes with gigabit LTE which means it simply cannot offer the same level of mobile data speeds as the Galaxy. While it also lacks Wi-Fi 6, that’s irrelevant since most consumers only have Wi-Fi ac routers in their homes right now.

Additionally, the Galaxy S10 features headphone jack while the iPhone XS only features one physical port — a Lightning connector.
Battery


iPhone XS – 2,658mAh


Galaxy S10 – 3,400mAh

The iPhone XS comes with a 2,658mAh battery, while the Galaxy S10 comes with a bigger 3,400mAh battery. This should mean the S10 will offer notably longer battery life than the iPhone XS. But since it also has to power a bigger, higher-resolution, and more power hungry display, its battery life will take a hit. Nonetheless, the S10 should offer the same or slightly better battery life than the iPhone XS in most cases.

The Galaxy S10 does win in terms of charging times. While Samsung has not improved the wired charging speeds, it does at least ship the S10 with a 15W power adapter compared to the paltry 5W charger that Apple ships with the iPhone XS.

Both phones also support Qi wireless charging but the Galaxy S10 again wins here since it can charge at 12W wirelessly. That’s not as fast as the Mi 9 which can charge wirelessly at 20W but still faster than the iPhone XS which is limited to 7.5W.

Plus, the S10 also features reverse wireless charging dubbed Wireless PowerShare which one can use to charge their Galaxy buds or other similar accessories featuring wireless charging. While the feature can also be used to charge other phones wirelessly, that’s a bit impractical since it would end up completely draining the battery of the phone itself. What’s even better is that you can charge the Galaxy S10 and use Wireless PowerShare to charge another device using the phone at the same time.
Price

The Galaxy S10 and iPhone XS both start from $899 in the United States. Despite the same starting price tag, the Galaxy S10 is the more attractive proposition due to the attractive pre-order and launch day bundles offered by Samsung and other retailers.


What do you think about the Galaxy S10? Will you buy it over the iPhone XS? Drop a comment and let us know!Sponsor ads:how to remove cydia
Must Read:If you lost data after you updated to a new iPhone, you can always use Gihosoft iPhone Data Recovery to get the data back from the old iPhone or backup.

Gihosoft Free iPhone Data Recovery:iphonerecovery.com

If you use android phones, please choose Gihosoft Android Data Recovery

Tuesday, 19 February 2019

How to Permanently Delete Facebook Messages on iPhone iOS 2019


How to Permanently Delete Facebook Messages on iPhone iOS

When seeking a method to delete your messages on Facebook, you have to make a decision between one of two options: clearing a specific message or the entire conversation. But it does not matter; we list the detailed steps for both of the options:
Step 1: Delete Messages on Facebook
How to Delete a Specific Message on Facebook

1: Launch your Facebook messenger app from your iPhone.

2: Opening the conversation that contains the message you want to delete.

3: Click and hold the message you would like to delete. Here you will see a menu showed up with black color.

4: Click on Delete to remove it from your iPhone.


How to Delete Facebook Conversations

1: Run Facebook app on your iPhone and locate the conversations you want to delete.

2: Swipe left across the conversation you would like to erase.

3: Click on ‘Delete’ to remove this conversations from your iPhone.


Note

To delete Facebook messages on iPhone is easy, but there are still lots of fragments left. Some professional recovery software in market can easily recover your messages using the left fragments. So, in order to avoid privacy leak, you must permanently erase these left fragments.Sponsor ads:

Gihosoft Free iPhone Data Recovery:iphonerecovery.com

Free iPhone Data Recovery Software for Windows/Mac

Recover up to 12+ types of files, including contacts, SMS, photos, WhatsApp, Viber, notes, etc.

Restore lost data from iOS devices directly or from iTunes and iCloud backup

Recover iPhone data lost due to iOS upgrade/jailbreak, accidental deletion, device lost or broken

Support all the latest iPhone, iPad and iPod Touch

Both Free and Pro version.

If you lost data after you updated to a new iPhone, you can always use Gihosoft iPhone Data Recovery to get the data back from the old iPhone or backup.

Top 10 Best FRP Bypass Tools to Bypass Google Account on Android Device 2019

Worth reading:download youtube 1080p

If you use android phones, please choose Gihosoft Android Data Recovery

Jihosoft Android Data Recovery: the best Android Data Recovery software for Windows and Mac to recover deleted contacts, messages, photos, videos, WhatsApp and etc from Android

Possible Ways to Clean Your Mac Manually

Possible Ways to Clean Your Mac Manually Uninstall unneeded apps With time, according to your usage you install many apps on your device. W...